Order a playlist from our site. The instant the order is completed, you are presented a link to start the download. If you miss that, not a problem, you are instantly sent an email with the link to download, as well.
Once your file is downloaded, using your computer, you will see The Playlist-I-Just-Ordered-bpm.zip file in your Downloads folder (Note the Zip at the end). You will need to extract that file. Usually during the Extraction process (Right click, Extract All, etc.), the file is extracted to your Downloads folder, also, where your downloaded files are. Once the file is extracted.
Open iTunes, create a play list, called, in this case The Playlist-I-Just-Ordered-bpm. Make sure you can see iTunes and your Downloads folder at the same time. Then put your mouse over the The Playlist-I-Just-Ordered-bpm folder, not the Zip file. Left click, hold the button down, then drag that folder over to your newly created Playlist on iTunes, let go of the left button. All the songs should start populating your playlist.
Now that you have your new playlsit in your iTunes, it is time to get it on your iDevice:
- Connect your iOS device to your computer with a USB cable, then open iTunes and select your device.
- Click Summary on the left side of the iTunes window.
- Select “Sync with this [device] over Wi-Fi.”
- Click Apply.
We have a FREE downloadable mix that you can practice how to download. The download is not meant to teach any classes, only to practice and learn how to download using your Cell, Tablet, or Computer. Be sure to check out our Help section for tutorials on best practices of downloading. The link to that Practice Download is Here
The Best and Easiest way to get your music into iTunes:
Once the file is downloaded, it should only take a couple of minutes to get the music into iTunes.
Again, once the file is downloaded, Right click on it, and Unzip/Extract the file. It will Unzip/Extract into its own folder. Open iTunes, create a Playlist, name the Play list the name of the Mix.
Making sure you can see iTunes and the Folder with your music, drag the Folder (Not the individual songs from inside the folder) onto your new playlist. The playlist will now populate with all the music with in the folder, In proper order.
Using a PC
- Connect your iOS device to your computer with a USB cable, then open iTunes and select your device.
- Click Summary on the left side of the iTunes window.
- Select “Sync with this [device] over Wi-Fi.”
- Click Apply.
iPhone Sync to iTunes over Wi-Fi
If connecting your iPhone to your Mac via a cable feels like a strait jacket, you can now break free by setting up a sync through your Wi-Fi connection. That’s right, no more looking for cables. If only we could charge this way as well…hey Apple, what are you waiting for?
There is a downside to this freedom; the speeds won’t be as fast as when connected with a cable. But if you value convenience over speed, let’s get to the steps you’ll need to setup wireless iPhone sync with Mac.
- Unfortunately you’ll need your USB cable to set up Wi-Fi syncing for the first time.
- Connect your iPhone to your Mac via your cable.
- Launch iTunes and click on the iPhone icon.
- Click on the Summary tab.
- Under Options check the Sync with this iPhone over Wi-Fi box and click Apply.
- Now you can remove the cable. Freedom is at hand!
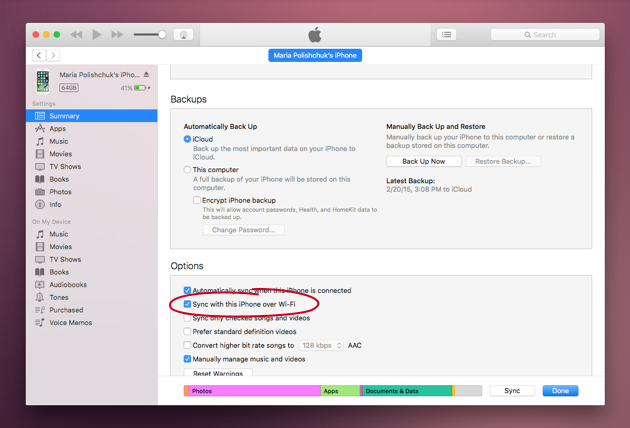
That’s it. Now, in future, when your iPhone connects to the same Wi-Fi connection it will be available for syncing in iTunes.
Now go ahead and throw that iPhone cable in the trash!*
*Don’t do that. That’s a terrible idea.
This is usually caused by your song list being out of order. Instructor Music designs our mixes to be in the order listed on the product description. Verify that your song list is in the proper order. Often times, that happens when you select all the songs in the folder as opposed the folder when creating your playlist in iTunes.
The Best and Easiest way to get your music into iTunes:
Once the file is downloaded, it should only take a couple of minutes to get the music into iTunes.
Again, once the file is downloaded, Right click on it, and Unzip/Extract the file. It will Unzip/Extract into its own folder. Open iTunes, create a Playlist, name the Play list the name of the Mix.
Making sure you can see iTunes and the Folder with your music, drag the Folder (Not the individual songs from inside the folder) onto your new playlist. The playlist will now populate with all the music with in the folder, In proper order.
When you’re burning a CD in iTunes, you may need to ensure that the CD you’re burning is gapless so that it plays back the way it was meant to sound. Here’s how to burn a gapless CD in recent versions of iTunes:
Here’s How:
- Follow the standard steps for burning a CD. These include making a playlist, adding songs to it, and inserting a blank CD.
- When you click the Burn Playlist to Disc button, a window will pop up.
- In the window, there will be a menu labeled Gap Between Songs. The drop-down menu next to it lets you choose how long the silence between songs will be. For a gapless CD, choose 0 seconds.
- Click Burn and your gapless CD will be created.
What You Need
- A blank CDR
- An iTunes library with music in it
- A CD/DVD drive that can burn CDs
UPDATE March 2013: As of iTunes 11, the Gapless Album setting has been removed. That doesn’t mean that support for gapless playback has disappeared though. According to this helpful iLounge article, gapless playback is now supported by default and automatically, so there’s no need for a separate feature. Early versions of iTunes still have the setting described below.
Most albums have short sections of silence between songs. But not all of them do — some albums are designed to have one track flow directly into the next; that silence actually disrupts the way the music is supposed to sound. This is especially true of live albums, concert bootlegs, and classical music CDs.
To address this need for what is called “gapless playback,” Apple added a feature to iTunes 7. You can now set an album to not have any gaps of silence before or after it, ensuring that the music is heard as it was intended.
Here’s How:
- The first step in setting gapless playback is to find the album you want and select all the tracks on it. Do this by navigating through your iTunes library, finding the album you want to edit, and then selecting all songs on it (do this by clicking one song on the album and then going to the Edit menu and choosing Select All).
- Now, use the Get Info command to open a window with the settings for the album. You can do this by going to File -> Get Info or by using the keyboard:On a Mac -> Apple key + I
On Windows -> Control + I - Look to the bottom right of the pop-up window. You’ll see an option labeled “Gapless Album.” Click the checkbox next to it and select “Yes.”
- Click “OK.” Now, when this album plays back as a whole, it will play without the bits of silence between tracks, improving the experience of listening to it.
- NOTE: Gapless playback is not supported by all iPods. See the list of iPods that support gapless playback.
For Android Phones:
You will need 2 apps on your phone in order to successfully download and play our mixes on your phone– both of the ones I used were free:
- a zip/unzip app,- there are several but we use – AndroZip™ File Manager
- a music player that supports GAPLESS playback – we use PowerAmp Music Player – Free 15 day Trial , then $3.99 to upgrade
Before starting , realize that a phone (at least mine) is much slower than a computer ….so patience during the download process is important……
Using your phone, place your order on our site. Once your order is complete you will get a screen with a ‘download file’ link. Press that and wait – file sizes are 50 – 90 MB, depending on what mix you ordered. The music player on my phone gives me 9GB so there’s room for 100 of our largest mixes in the player memory. Of course the amount of memory that you have available will depend on how many pictures/videos/texts/music, etc files that you already have loaded, so make sure that you have enough room BEFORE you start downloading.
- Open your AndroZip app on your phone. The zip file for the mix loads directly into the AndroZip/Download folder
- Once the download onto your phone is complete, click on the zip icon with the music file and select ‘extract file here’ . A progress bar will indicate that the file is unpacking…
- Once the file is unpacked/extracted, there will be a new folder in AndroZip/download which contains the unzipped music tracks
- Press the new music folder icon until a pop up appears and lets you select ‘Move’
5. Press the ‘MOVE HERE’ box at the top right of the screen, and a message ‘file moved successfully’ will appear on your screen
- Now click ‘CPU’ on top right corner and search the list for your PowerAmp Music Player icon
- Check the box to the right of the icon, click on the icon and select start
- This will take you to your PowerAmp Music Player album area. If you’ve done everything correctly, you mix should be sitting in the Album area. From here you can create a playlist and move your tracks into the playlist or just play directly from the album…
iPhone:
Starting with iOS7 , iDevices cannot natively download files, with out using a third party app …Apple has decided that only music purchased through their iTunes store can be downloaded directly on to iOS phones and iDevices and played through iTunes player on the device.
You can use your computer to download the mixes, extract them, then transfer them to your iDevice. See other tutorials of how best to do that.
Below is a link to a page, that is not affiliated with Instructor Music in any manner, that lists several apps to download and extract our mixes.;
http://appadvice.com/appguides/show/download-apps-for-the-ipad
Instructor Music has no affiliation with any of the “Apps” mentioned above, and we do not endorse them. Our Fitness Instructors have used these Apps with success for their iDevices. Although, these Apps may work for you, we cannot support them, as we have no affiliation with those Apps.
As for custom mixes, we no longer do “custom” mixes, meaning, you order a custom mix and we bust it out for you. In that essence, no we don’t.
However, if you have a list of titles at least 17 titles long, preferably 20 titles long. We will take that list, and if the DJ’s think it will work, they will make it. Be warned, that it won’t happen right away, as they typically are working on new mixes already and will need to fit into their schedule. If they do make “your” CD Mix, we will release the mix when it is done to our whole customer base. At that point, you are under no obligation to purchase the mix after it goes live on the sites, but you are more than welcome to.
As not all songs in your list will work, or we cannot find that particular song, we reserve the right to replace any song in your list, with a song of Instructor Music’s choice.
How to Transfer Files to Your iPhone or iPad (for Beginners)
While it’s actually a very simple operation once you know how to do it, it’s not something that’s very obvious to people who are new to iOS (as many iPad users are). Here’s a look at the simplest method of transferring files to an iDevice for those who don’t yet know how to do it.
The video above will walk you through the process visually, but here are the basic steps you need to follow:
- Connect your iPhone, iPod touch, or iPad to iTunes. (You can let it sync if you want, but this isn’t necessary.)
- Click on your device in the list on the left side of iTunes. (It’ll be under the “DEVICES” header.)
- Click the “Apps” tab up on top in the main panel of iTunes.
- Scroll down to the bottom where you’ll find a “File Transfer” section with a list of apps. From that list, choose an app you want to transfer a file to.
- Onto the (probably empty) space to the right of the apps list, drag in the file you want to transfer. You can also click “Add…” to browse for the file and choose it. As soon as you’ve chosen the file, it will transfer to your device. You’ll see the progress at the top of the iTunes window. When it’s done you can disconnect and your file will be on your device.
Some apps provide additional ways to transfer files that you may prefer, but this is the most straightforward method and it works for every app that supports files. If you’d prefer to transfer over Wi-Fi (or another method), check the app to see if it has other methods. These methods vary from app to app, but most provide instructions so you can learn how to use the various transfer methods. They’re worth exploring if you prefer to avoid connecting your device to your computer every time you want to transfer a file.[/vc_toggle][/vc_column][/vc_row][vc_row][vc_column][vc_toggle title=”iTunes: How to Copy Playlists to iPhone, iPad, or iPod”]
iTunes: How to Copy Playlists to iPhone, iPad, or iPod
Apple iTunes has been redesigned, and figuring out the new interface can be a bit daunting. Copying playlists to an iPhone, iPad, or iPod is a bit different depending on the version you are using. Here’s how it’s done.
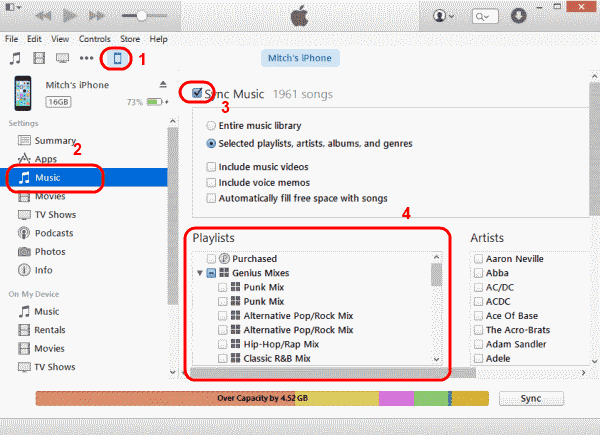
iTunes 12 – Option 1
- Connect your device to the computer.
- Select the icon for your device, located at the upper-left portion of the screen.
- Select the “Music” option on the left pane.
- Ensure the “Sync Music” check-box is selected.
- In the “Playlists” section, check the playlists you wish to sync with your iOS device.
- Select “Sync” and your playlist should sync.
iTunes 12 – Option 2
- Connect your device to the computer.
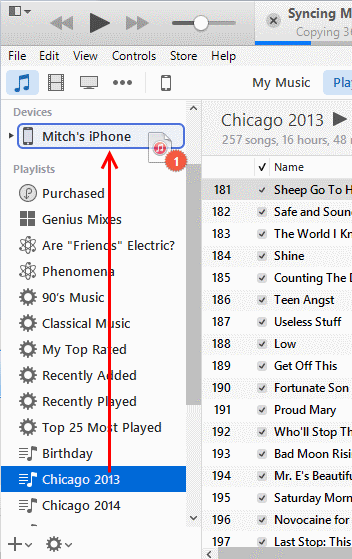
- “Music Playlists” should be listed in the left pane. Select the playlist(s) you wish to sync, then drag them up to your device listed in the “Devices” section on the left pane. They will then sync to your device.
iTunes 11
- Connect your device to the computer. A button should appear for your device in the upper-right portion of the screen. Click it.
- Select Add To… This will make a contents menu available on the right side.

- Select “Playlists” at the top of the screen.
- Drag any playlist from the left side to the right side.

- Click “Done“, then select the “Sync” button in the lower right corner of the screen to sync your changes.
You have successfully transferred a playlist to your Apple device.
Get WinZip – For PC or Mac[/vc_toggle][/vc_column][/vc_row]